A search bar in most applications lets you find documents by just typing in some words. We’ll implement this not like a search-filter, but instead, as an autocomplete that finds all issues matching the words typed, and lets the user pick one of them to directly view. We’ll add this search in the Navigation bar since the user should be able to jump to a particular issue, no matter which page they are viewing.
Assuming that the number of issues is large, it wouldn’t perform well if we were to apply a filter criterion, say, a regex on all the issues. That’s because to apply the regex, MongoDB would have to scan all the documents and apply the regex to see if it matches the search term. MongoDB’s text index, on the other hand, lets you quickly get to all the documents that contain a certain term. A text index gathers all the terms (words) in all the documents and creates a lookup table that, given a term (word), returns all documents containing that term (word).
You can create such an index using the following MongoDB shell command:
db.issues.createIndex({ title: "text" })
This will collect all the terms in the field title and create a text index. Now the documents can be searched using the usual find() method, with a special filter like this:
db.issues.find( { $text: {$search: "lorem" } } )
This will quickly give you the list of documents that had the term “lorem” in it. Note that this does not go through all the documents in the collection to try to match the contents. Instead, it looks up the index for the term “lorem,” which already has the IDs of all documents containing this term.
Let’s first change the initialization script (and optionally rerun it, as well as the generation script) to create this index. If you don’t want to go through the reinitialization, you could just execute the createIndex() command manually. The changes to the initialization script are shown below.
init.mongo.js:
...
db.issues.createIndex({ created: 1 });
db.issues.createIndex({ title: "text" });
...
init.mongo.js is used to add createIndex for a Text Index on Title
The next step is to use this index in the List API to find documents containing a given term. All we need to do is add a filter criterion if we find a request parameter for search. This is shown below.
server.js:
...
if (req.query.effort_gte) filter.effort.$gte = parseInt(req.query.
effort_gte, 10);
if (req.query.search) filter.$text = { $search: req.query.search };
...
server.js is used to list API Changes to Include a Text Search Filter.
Now you should be able to test the new filter using curl to see if you get document matches. You’ll probably notice that MongoDB searches only for whole terms. I’ll discuss the impact of this a little later.
Let’s now install a package that provides an auto-complete: as you type in a word, it lists all the matching issues in a drop-down. It lets you pick one so that you can view that document. I’ve chosen a package called react-select that we’ll install using
$ npm install react-select –save
This component also requires that we include some CSS styles, which are part of the distribution of the package. So, as we did for Bootstrap, we’ll soft-link (or copy, if you’re using Windows) the CSS from its distribution directory to the application’s static directory:
$ ln -s ../node_modules/react-select/dist static/react-select
We’ll also have to include the stylesheet in the HTML that is generated using the template. This change is shown below.
template.js:
...
 <link rel="stylesheet" href="/bootstrap/css/bootstrap.min.css" >
 <link rel="stylesheet" href="/react-select/react-select.css" >
...
template.js is used to include react-select Stylesheet.
Now that we have the infrastructure in place, we can add the auto-complete component to the header’s Navigation bar. We’ll separate out the Header component for convenience into a separate file because we now have a lot of code that deals with the auto-complete. In the header, we’ll need to divide the space into three columns since the react-select component happens to be a <div> that will occupy the entire width of its parent. We’ll use Bootstrap’s Col components to do the division of space.
In the middle column, we’ll place the Select component imported from react-select. We’ll use the Async variant of this component since that’s the one that loads the list from the server asynchronously. The important properties that this component needs are the functions that load the options asynchronously and the function that is to be called when an item in the drop-down is selected. With these functions implemented, the below code is for the new Header component.
Header.jsx:
import React from 'react';
import { Navbar, Nav, NavItem, NavDropdown, MenuItem, Glyphicon, Col } from
'react-bootstrap';
import { LinkContainer } from 'react-router-bootstrap';
import { withRouter } from 'react-router';
import Select from 'react-select';
import IssueAddNavItem from './IssueAddNavItem.jsx';
import withToast from './withToast.jsx';
const Header = (props) => {
function searchIssues(input) {
if (input.length < 2) return Promise.resolve({ options: [] });
return fetch(`/api/issues?search=${input}`).then(response => {
if (!response.ok) return response.json().then(error => Promise.
reject(error));
return response.json().then(data => {
const options = data.records.map(issue => ({
value: issue._id,
label: `${issue._id.substr(-4)}: ${issue.title}`,
}));
return { options };
}).catch(error => {
this.props.showError(`Error fetching data from server: ${error}`);
});
});
}
function filterOptions(options) {
return options;
}
function selectIssue(item) {
if (item) props.router.push(`/issues/${item.value}`);
}
return (
<Navbar fluid>
<Col sm={5}>
<Navbar.Header>
<Navbar.Brand>Issue Tracker</Navbar.Brand>
</Navbar.Header>
<Nav>
<LinkContainer to="/issues">
<NavItem>Issues</NavItem>
</LinkContainer>
<LinkContainer to="/reports">
<NavItem>Reports</NavItem>
</LinkContainer>
</Nav>
</Col>
<Col sm={4}>
<div style={{ paddingTop: 8 }}>
<Select.Async
instanceId="search" placeholder="Search ..." autoload={false}
cache={false}
loadOptions={searchIssues} filterOptions={filterOptions}
onChange={selectIssue}
/>
</div>
</Col>
<Col sm={3}>
<Nav pullRight>
<IssueAddNavItem showError={props.showError} />
<NavDropdown
id="user-dropdown" title={<Glyphicon glyph="option-horizontal"
/>} noCaret
<MenuItem>Logout</MenuItem>
</NavDropdown>
</Nav>
</Col>
</Navbar>
);
};
Header.propTypes = {
showError: React.PropTypes.func.isRequired,
router: React.PropTypes.object,
};
export default withRouter(withToast(Header));
Header.jsx is a New Component Extracted Out of App.jsx, to Include the Search Bar
There were three methods that we supplied to Select.Async as properties. The first is loadOptions, which makes an Ajax call to search issues based on the input text. The return value is an object with a key option that holds an array of matching options, with a value and a label. The value is the key to each item that is matched, so we used the _id of the issue for this. As for the label, we used the title of the issue, and this is what will be displayed in the drop-down that is shown after the user types in a few characters.We also have a handler for filtering the options:
...
 function filterOptions(options) {
 return options;
 }
...
Normally, the Select component looks at the list of options that we gave it, and further filters it based on what the user has typed. To override this and tell it that the list has already been filtered based on the input text, we had to return the fetched array, no matter what the input was. This ensures that the list fetched from the server is shown in its entirety, without another filter applied by the Select component.
The property instanceId is needed to work around a bug in this module, which causes server-rendering issues if not supplied. The onChange handler uses the selected item’s ID and routes the router to display the page that shows the selected issue.
Finally, since the header is now in a separate file, we’ll need to remove this from the App component and import it instead. The new file is shown below.
App.jsx:
import 'babel-polyfill';
import React from 'react';
import Header from './Header.jsx';
const App = (props) => (
<div>
<Header />
<div className="container-fluid">
{props.children}
<hr />
<h5><small>
Full source code available at this <a href="https://github.com/
vasansr/pro-mern-stack">
GitHub repository</a>.
</small></h5>
</div>
</div>
);
App.propTypes = {
children: React.PropTypes.object.isRequired,
};
export default App;
App.jsx is used to rewrite After Separating Out the Header
To test it, it’s best to add new issues manually with different words. The search is case insensitive and also does word stemming: you can type missed and it will match miss, missing, etc. But you’ll find that you need to type a whole word (or more) for the text index to match. For example, if you type con, the issue containing the word console will not be fetched. This is due to the text index in MongoDB. This is the trade-off between faster searches and flexibility. If you really want the user to be able to type just con and the search to return the issue, you must use a regex-based search, but this cannot use an index. It will have to scan through the entire collection to find all the issues that match the regex.
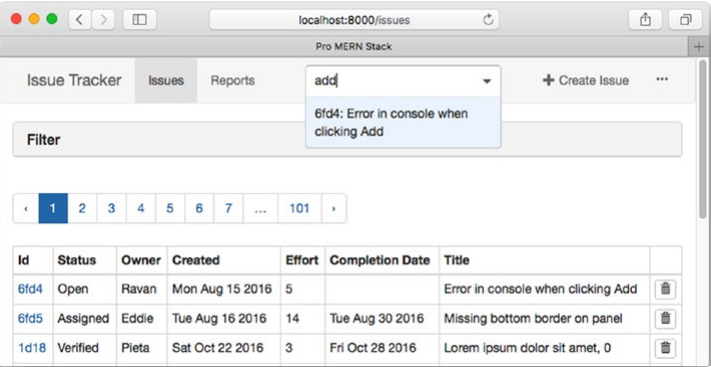
A screenshot of the application’s Issue List page after including the search bar in the header is shown in the below figure.